This section describes how to manage SC401, toner scatter, and dirty background. Conditions that increase the risk of these problems include:
- Allowing the machine to remain idle for long periods where the humidity is high.
- Where average coverage is consistently 4% or lower.
- 20 P/J or lower average P/J
Causes
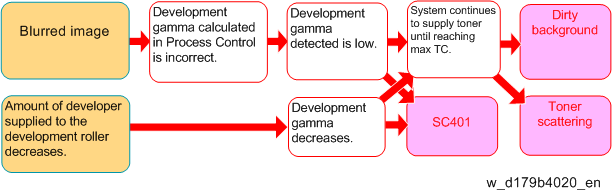
- Process control fails. The development gamma detected in process control was lower than 3.0 because the ID sensor pattern created on the drum was blurred. (Blurred Images (Convex Lens Shaped))
- Due to the degradation of toner over time, and the adhesion of toner on the doctor blade, the amount of developer supplied to the development roller decreased and development gamma becomes fell lower than 3.0.
- In addition to SC401, toner scatter and dirty background could also occur because the system supplies too much toner to compensate for reduced development gamma.
Solution
Do these procedures if the machine is issuing SC401, or if you observe toner scatter or dirty backgrounds in prints.
- Open SP2109-003, select Patter #12 (2-dot Independent Pattern), and then print three copies of the pattern on A3/DLT.
Does the pattern appear blurred?
Yes
Do the following SP settings:
- SP2810-001: 1 (default). This setting will automatically execute "Clear Blurred Image" at all times.
- SP2810-005: 360 (default). Set to "120". This setting will automatically execute "Clear Blurred Image" if the machine remains idle for 2hrs.
- SP2810-006: 13 (default). Set to "7". This setting will automatically execute "Clear blurred image" even when the machine is operated in a medium temperature, medium RH environment.
Do SP2810-004 (Clear blurred image).
Go to Step 3.
No
Go to Step 4
Has the blurred image problem been resolved?
Yes
Go to Step 4
No
Repeat SP2810-004 (Clear Blurred Image)
If the blurred images cannot be corrected after executing this SP code three times, replace the drum, and then go to Step 4.
- Clean the doctor blade, development roller, potential sensor and ID sensor. Refer to the Field Service Manual for the cleaning procedures.
When cleaning the doctor blade:- Doctor blade cleaning is different for this machine. Refer to the doctor blade cleaning instructions in the Field Service Manual.
- Be sure to use the special tool (shown below) to rotate the development roller during servicing.

- Before cleaning the doctor gap, confirm that there is no old developer on the development roller as shown below.
- After cleaning the doctor gap with the cleaning tool use a vacuum cleaner to completely remove any toner particles.
- Calculate the average coverage and average P/J.
- Average coverage = SP8921-001 / SP8581-001
- Average P/J = SP8581-001 / Sum of SP8071-001to014
Either or both of the following conditions met?
Average coverage ≤ 4 (%)
Average P/J ≤ 20Yes
- Change the setting of SP3-820-001 (Tnr Refresh Mode: Img Area Thresh: K) setting from "2" (default) to "3".
No
Do SP3-011-002 (Density Adjustment) for process control.
Make 20 copies of the same test pattern. Has the problem been resolved?
Yes
Finished.
No
Replace the developer. If replacing the developer does not resolve the problem, replace the development unit.