- Remove the front cover [A] (
x3).
- Remove the rear cover [B] (
- Disconnect the top cover (
- Remove the top cover.
- Open the separation unit.
- Disconnect the separation unit (
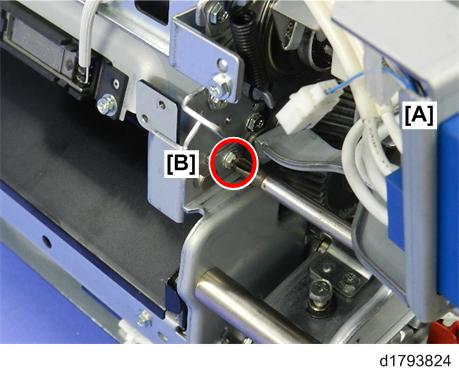
- At the rear [A], disconnect the separation unit (
x1).
- Open the clamp [B].
- Pull the harness [A] through the frame, and then free the harness at [B].
- Pull the harness away from the side of the fusing unit.
Release the springs
on both ends of the separation unit, and then lift it straight up
to remove it.
- Hold the separation unit on both ends and lift it straight up to prevent bending it.
- When you re-install the separation unit, hold it straight on both ends, and then lower it straight down.
Lay the separation unit down with its edge up [A].
- Never lay the separation unit down with its edge down [B].
- At the rear, disconnect the lamp connector bracket (
- Disconnect the bracket at [A], and then unhook the bracket [B], and then allow the bracket to hang free (
- Insert a long screwdriver through cut-out [A] and remove the hidden screw (
x1).
- At the rear [A], remove screw [B] (
At the front [A], remove screws (
- At re-installation, install the step screws (
- At re-installation, install the step screws (
- Disconnect springs at the front [A] and rear [B] (
x2).
- At the rear [A], remove the screw and the bushing [B] (
x1).
At the rear connector, disconnect the heating roller lamps (
- The heating roller lamps are connected at the outside to the right of the drawer connector. They must be re-connected at the outside. However, their order of installation (top to bottom) is not important. They can be re-connected in any order.
- At the front [A], use a marker to mark the thermostat connectors so they can be re-connected at the correct terminals.
- Disconnect the heating roller thermostat connectors [B] (
- At the front, remove the heating roller lamp bracket (
- At the rear, remove the other heating roller lamp bracket (
- The front end [A] and rear end [B] of the heating roller fusing lamps are now free and ready for removal.
- The lamps can be removed from either end of the roller.
- On one end of the roller, push the end of the lamp [A] into the roller.
- Slowly, pull the lamps [B] out of the other end of the heating roller.
Always hold the lamps by the ends.
- Never touch the glass surface of a fusing lamp. Oil from the fingers can cause the lamp to burn unevenly.
- If you mar the surface of a lamp accidentally, clean with a clean cloth dampened with alcohol, and then allow it to dry completely.