Method 2 is faster and easier than Method 1 described in the previous section.
- If there is any image skew, this must be corrected before doing the front/back registration adjustment.
- You can do this procedure with the following paper sizes:
- SRA3, A3, 13" x 19", 12" x 18", 11" x 17", 315 mm x 450 mm, 318 mm x 469 mm, Custom paper sizes between A4 and 13" x19"
- Turn off the main machine.
- Remove the SD card slot cover, and then insert the "NICE for registration" SD card into Slot 2. (
x1)
- Turn on the main machine.
- Press the Program key on the operation panel to open the NICE menu.
- On the Main Menu, press [01 Registration adjustment: Fine] or [02 Registration adjustment: Coarse].
- 01 Registration adjustment: Fine. This selection adjusts the registration of front and back sides by scanning a test chart six times (front and back 3 times each)
- 02 Registration adjustment: Coarse. This selection adjusts the registration of front and back sides by scanning a test chart twice (front and back once each). This adjustment is rather easy, but if you need more precise adjustment, do the Fine adjustment.
- Select the tray for the registration adjustment, and then press [Select]. Note that the adjustment is done for each tray.
Adjustment is available only for trays associated with custom paper settings. Trays used under manual settings are grayed out and cannot be adjusted. - Press [Start OK].
- Wait for the test chart to print out.
The illustration above shows an example of the sequence for the 'Registration adjustment: Fine.' procedure Check the printouts. The number of test charts printed differs depending on the type of adjustment selected (01 Fine, or 02 Coarse).
01 Registration adjustment: Fine. Test chart (x3), Blank sheet (3 copies printed respectively before and after the test chart).
Registration adjustment: Coarse:Test chart (x1), Blank sheet (3 copies printed respectively before and after the test chart)Blank sheets are not used for the adjustment.
- Press [Start OK].
- To start scanning the FIRST side (front), place the test chart so that the side marked 'FIRST' is facing up. Fold the 4 corners along the dotted lines printed on the back side.
For '01 Registration adjustment: Fine', do the same for the remaining 2 charts.
For best results, fold along the line exactly - Place the chart on the exposure glass so that the side marked 'SECOND' is facing up, because you will be scanning the FIRST side. Make sure the top and left edges of the chart are set flush against the edges of the exposure glass.
- Press [Start OK] to start the scan.
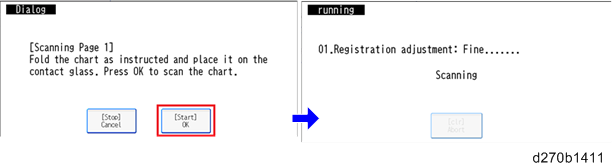
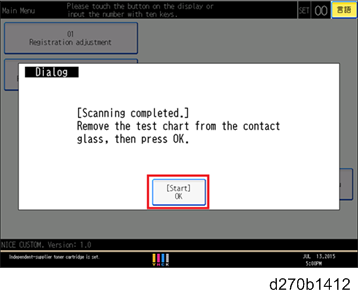
- After the scan completes, remove the chart from the exposure glass, and then press [Start OK]. For 'Registration adjustment: Fine', do the same for the 2 other charts.
From the scanned data, the software application on the NICE SD card reads the distance between the dotted lines along the folded edges and the paper edge on all 4 corners.
An error message will appear:
(1) if the same chart was scanned
(2) if the wrong side of the chart was scanned
(3) if the chart was not placed correctly on the exposure glass.
Press [Start Retry] and scan again to recover from the error To start scanning the SECOND side (back), flip the chart and fold the 4 corners along the dotted lines as you did for the FRONT side above, but this time with the side inscribed 'SECOND' facing up. For '01 Registration adjustment: Fine', do the same for the 2 other charts.
Place the chart on the exposure glass so that the side marked 'FIRST' is facing up, because you will be scanning the SECOND side. Make sure the top and left edges of the chart are set flush against the edges of the exposure glass.
Press [Start OK] to start the scan.
After the scan completes, remove the chart from the exposure glass and press [Start OK].
For 'Registration adjustment: Fine', do the same for the 2 other charts. The screen below is displayed while the system makes the adjustments.
- Press [Start OK] to print out the test charts and blank sheets, and check the results.
The number of test charts printed differs depending on the adjustment (Fine or Coarse).- 01 Registration adjustment: Fine: Test chart (x3) and blank sheets (3 copies respectively before and after the test charts).
- Registration adjustment: Coarse: Test chart (x1) and blank sheets (3 copies respectively before and after the test charts).
- Press [Start OK] to finish.
When the procedure is finished, you will see the initial NICE menu. - Press the Program key to exit NICE.
- Turn the machine off, remove the SD card from Slot 2, and then replace the SD card slot cover.
- Turn the machine on.