- Remove the unit from the box and separate the accessories.
- Disconnect the tagged shipping clamps (
 x4).
x4).

- Remove brackets, tags, wires, screws and then discard them.

- Attach the clamps (
 x2).
x2).

- Connect the accessory harnesses [A] (
 x2).
x2). - Open the clamp [B] and pull out the harness (x1).

- On the back of the decurl unit, free the folded harness (x7).

- Close the clamps again around the single harness (x7).
- Make sure that the permanent bands are positioned as shown at the arrows.

- Gather the loose harnesses and clamp them at the rear (x2).

- Remove the left cover [A] and the rear cover [B] (x7 each).

- On the left side of the main machine, disconnect the exit guide (x2).

- Remove the exit guide.

- Disconnect the safety plate (x4).

- Unhook and remove the safety plate.

- Disconnect the bracket. Do not discard the screws! This bracket will be re-attached (x2).

- Push the bracket up to unhook it, and then remove it.

- Locate the holes where you are going to hang the decurl unit.

- Bring the decurl unit to the left side of the machine.

- Hang the unit on the left side of the machine by the rear hook [A] and the front hook [B].

- Fasten the rear end [A] and the front end [B] of the decurl unit (x4 M4x8).

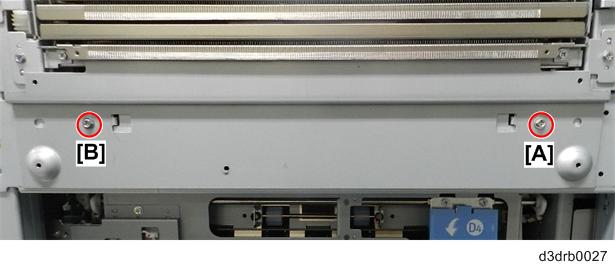
- Set the DDRB as shown, and then fasten it (x4 M3x6).

- At the rear left corner of the machine [A] open the clamps and free the three folded harnesses (x3).

- Clamp the harnesses again [A], and then push the freed ends of the harnesses through the frame [B].

- Pull the harnesses [A] up toward the PCB.
- Connect the large connector [B] (1x).

- Connect the small connector [A] (1x).
- Connect the socket connector [B] (1x).

- Set the edge saddle clamp [A] in the corner (x1).
- Connect the remaining harnesses from the decurl unit [B] (x2).

- Select the bracket and screws you removed earlier (x2).

- Slip the top edge of the bracket [A] up under the lip of the decurl unit, and then push it up.
- Set the hooks on both sides [B], and then let the bracket slip down and lock in place.

- Make sure the plate is flat against the side of the machine, and that the hooks are set securely.
- Set the screw at the rear, but do not tighten it (x1).

- Tap the rear edge of the bracket [A] until you see the holes [B] aligned at the front.

- Fasten screw [A] at the front, and then tighten screw [B] at the rear.
- Clamp the harnesses (x5).
- Before clamping harness [A], fold it over to take up slack with the permanent bands on either side of the clamp as shown.

- Re-attach the right and left covers of the main machine (x7 each)
- Attach the connection bracket of the downstream unit (x4 M4x8).

Expand All
- Read This First
- Product Information
- Installation
- Preventive Maintenance
- Replacement and Adjustment
- General Cautions
- Cautions for This Machine
- Special Tools and Lubricants
- Common Procedures
- Operation Panel
- ADF (Copier)
- Scanner Unit (Copier
- Laser Unit
- Toner Supply
- Around the Drum
- ITB Unit
- ITB Cleaning Unit
- Paper Trays 1, 2, 3
- Vertical Transport Unit
- Registration Unit
- Paper Transfer Roller (PTR) Unit
- Paper Transport Belt (PTB) Unit
- Fusing Unit
- Fusing Unit, Fusing Cleaning Unit Removal
- Periodic Cleaning
- Periodic Lubrication
- Heating Roller Fusing Lamps
- Hot Roller, Heating Roller, Fusing Belt
- Cleaning, Lubrication before Re-assembly
- Pressure Roller Strippers, Fusing Path Sensors, Anti-static Brushes
- Pressure Roller Fusing Lamp, Pressure Roller
- Thermostats, Thermistors, NC Sensors
- Thermopile
- Pressure Roller Lift Sensors
- Fusing Motor, Pressure Roller Lift Motor
- Fusing Cleaning Unit
- Main Machine Thermistor
- Invert, Duplex, Exit Unit
- Used Toner Path
- Filters
- Fans (Main Machine)
- Boards, HDD, Breaker Switch
- System Maintenance Reference
- Troubleshooting
- Servicing
- Self-Diagnostic Mode
- SC Code Descriptions
- SC100
- SC200
- SC300
- SC400
- SC500
- SC600
- SC700
- SC700
- SC700
- SC700
- SC700
- SC800
- SC900
- Image Quality Problems
- Fusing Problems
- Paper Delivery Problems
- Peripheral Unit Troubleshooting
- Finisher SR5050/SR5060
- Multi-Folding Unit
- Ring Binder Recognition: SC756-48
- Vacuum Feed LCIT
- Frequent Double Feeds, Failures to Feed
- Double-Feeding (J099, J470, J471, J485, J486)
- J430, J431,J445, J446, J460, J46
- Attaching the Magnetic Strip to the End Fence
- Clean Suction Fan Filter
- Cleaning the paper feed belt
- No Feeding
- Excessive Shift or Skew, Image Skew on Paper
- Folded Corners with Thin Paper
- Stack Remains Up
- Shift Over, Over Skew, Image Skew
- Adjusting Tray Side-to-Side Registration
- Correcting Skew
- High Capacity Stacker
- Punch Unit
- Improving Throughput
- Other Problems
- Paper Transport Roller/Rib Maps
- Jam Detection
- Fuses
- LEDs
- Detailed Description