The Auto Erase Memory function can be enabled by the following procedure.
A print data sent from a printer driver is temporarily stored on the machine's hard disk when the optional hard disk is installed. Even after the job is completed, it remains on the hard disk as temporary data. Auto Erase Memory erases the temporary data on the hard disk by overwriting it.
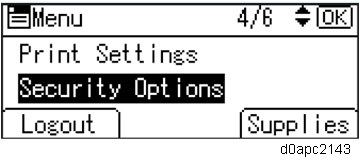
- Press the [Menu] key.
- Log in as the machine administrator.
- Select [Security Options], and then press the [OK] key.
Select [Auto Erase Memory Setting], and then press the [OK] key.
Select [On].
Press the selection key beneath [HDDErase], and then select the method of overwriting as follows:
Method of overwriting Description NSA Temporary data is overwritten twice with random numbers and once with zeros. DoD Each item of data is overwritten by a random number, then by its complement, then by another random number, and is then verified.
Random Numbers Temporary data is overwritten multiple times with random numbers. The number of overwrites can be selected from 1 to 9. (Default: 3)
- Press the [OK] key.
Log out.

When Auto Erase Memory is enabled, you can use the Memory Erase Status screen to find out whether there is any data to be erased in the memory.
1. Press the [Menu] key.
2. Select [Memory Erase Status], and then press the [OK] key.
3. "Currently no data to erase" appears.