1. Printing the Test Chart
- Display the NICE main menu screen. (How to Activate NICE)
Press "Print: FR Adjust: ES1000" to print out the test chart.
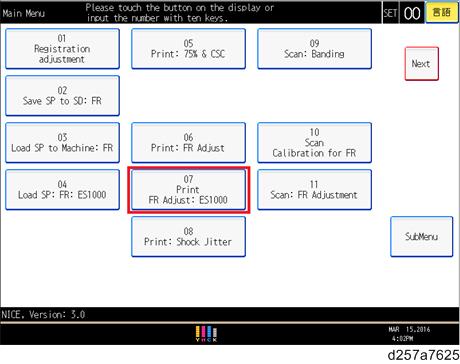
- Use coated paper to print out the test chart.
- Press "Print: FR Adjust: ES1000" to print out the test chart, even when the spectrophotometer (ES-2000 X-ritei1 Pro2) is used for this adjustment.
- Confirm that 4 copies of the test chart (K,C,M,Y) were printed out.
- Turn off the main machine and remove the NICE SD card from the service slot.
2. Measuring the Charts with the Spectrophotometer
Install the "Profiler Ver.1.5.6". After installing the i1 profiler, be sure to uncheck the checkbox "Check version and license status at startup." as shown here below. After unchecking the check box, "Check for update:" becomes "OFF".
- Insert the NICE SD card into the SD card slot on your PC.
- Open the i1 Profiler and change the user mode to "Advanced".
- Select "Measure Chart" under "Workflow selection".
Select the device, i1Pro (ES1000) or i1Pro2 (ES2000).
If the device is i1 Pro2, specify "Use Legacy Charts".
Specify the "Patch Layout" settings by referring to the table below.
A3 SRA3 11x17 (DLT) 12x18 13x19 Rows per page 10 10 10 10 10 Columns per page 27 29 25 27 29 - Connect the spectrophotometer to your PC.
- Click the "Measurement" icon.
If the message "Device not calibrated" appears, click "Calibration" and wait for the spectrophotometer to reach ready status.
- If the calibration fails as a result of insufficient power supply from the USB port, use a bus powered type USB hub.
- If the calibration fails due to deterioration of the light source, contact the vendor of the spectrophotometer.
- Select "Single scan" for "Measurement Mode".
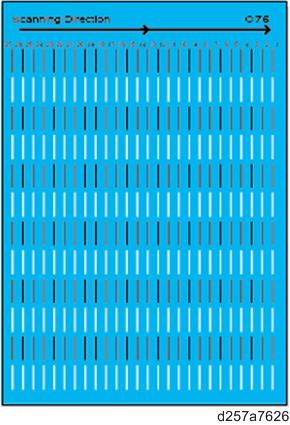
Scan the test chart for the color requiring the adjustment.
- Place the test chart on top of a stack of approximately 10 sheets as shown below.
[A]: Scan Direction
[B]: Fold along the margin
[C]: Set a stack of approximately 10 blank sheets from the same lot as the chart.
- Paper used for the chart and the stack should be from the same lot.
- Make sure to always scan 10 lines, no more or no less. However, if a band is observed in a line, avoid scanning that line.
- It is recommended to scan from the bottom line to avoid scratches caused by the cable of the spectrophotometer.
- Look at the PC screen and confirm that scanning has completed before scanning the next line.
- Place the test chart on top of a stack of approximately 10 sheets as shown below.
- After scanning 10 lines, click "Save".
- Specify the following on the "Save measurement" Screen.
- Save location: Specify the root directory of the NICE SD card.
- File Name: Specify the name same as the chart name (K75, M75, C75, or Y75). The chart name is indicated on the top right corner of the test chart. Naming is critical: do not use lower case, do not add anything. Specify only the chart name.
- File Type: Select i1 Profiler CGATS Custom (*.txt)
- Select the following check box on the "CGATS file format options" screen.
- Sample ID
- Asmple Name
- L*a*b*
Do not select the "Reflectance Spectrum" check box.
"Page Data" is saved in a text file format, for example, "M75_M*.txt". "_M*" is attached automatically when saving the file.
- Go back to Step 7 to do the same for the remaining colors.
- Remove the NICE SD card from the SD card slot on your PC, and then insert the NICE SD card into the service slot of the main machine.
3. Applying the Correction
- Display the NICE main menu. (How to Activate NICE)
- Press "Load SP: FR: ES1000" to print out the test chart.
Confirm that the file which appears in the pop-up dialog matches the file saved in the NICE SD card, and press "[Start] OK".
NICE calculates the shading adjustment values, and then SP values (SP2-152-xxx) will be overwritten in the engine.
- Press "[Start] OK" on the following screen.
- Turn the main power off and on for the modified SP values to take effect.
From the NICE sub menu screen, press "TestPrint" to print out the "75%’" test chart and check the image quality.
- It is not recommended to check the image quality with "Print: FR Adjust: ES1000" because the pattern is segmented and it is difficult to examine the entire image.
- After completing the adjustment, remove the uploaded files from the SD card.
4. How to Retrieve the Original SP Value
If you need to retrieve the previous setting, do the procedure below.
- Display the NICE sub menu screen. (How to Activate NICE)
- Press "Print: FR Adjust: ES1000".
- Press "Undo the Last". The previous SP values will be retrieved.
- Press "[Start] OK" on the following screen.
- Turn the main power off and on for the previous SP values to take effect.