Insert the SD card into the slot on the side of the operation panel or the service slot.

- It is recommended to use either the SD card with 2 GBs (P/N: B6455030) or 8 GBs (P/N: B6455040) provided as service parts. This is because the log data can be acquired much faster than when using commercially available SD cards.
- Format the SD card by using SD Formatter from Panasonic before copying the logs:
- https://www.sdcard.org/downloads/formatter (The URL is current as of Jun, 2016; and is subject to change)
- Insert the SD card into the machine’s service slot instead of the SD slot on the side of the operation panel.
- Turn ON the main power.
- Enter SP mode.
Specify the date that the problem occurred in SP5-858-101 (Start Date) by setting it to the year-month-day calendar format.

- For example, if a problem occurred on February 1, 2015, the date should be set to "20150201", as shown above.
- Be sure to confirm the date that the problem occurred before obtaining the logs.
Specify the number of days to collect the logs in SP5-858-102 (Days of Tracing).
- 2 (days) is set by default for MP 305+. The value can be changed from 1 to 180.
Execute SP5-858-111 (Acquire All Info & Logs) to copy all of the log types to an SD card.
- It is possible to obtain the logs separately by the SPs below:
- SP5-858-111: All of the information and logs collected by executing the SPs from SP5-858-121 to SP5-858-145, and SMC
- SP5-858-121: Configuration page
- SP5-858-122: Font page
- SP5-858-123: Print setting list
- SP5-858-124: Error log
- SP5-858-131: Fax information (whether the fax destinations are included or not depends on the setting of SP5-858-103)
- SP5-858-141: Controller debug log, engine debug log, operation panel debug log, and SMC
- SP5-858-142: Controller debug log
- SP5-858-143: Engine debug log
- SP5-858-144: Operation panel log
- SP5-858-145: FCU debug log
- SP5-992-001: SMC
After executing the SP for copying the information and/or logs, a confirmation screen will appear. To proceed obtaining the information and/or logs, press [execute].
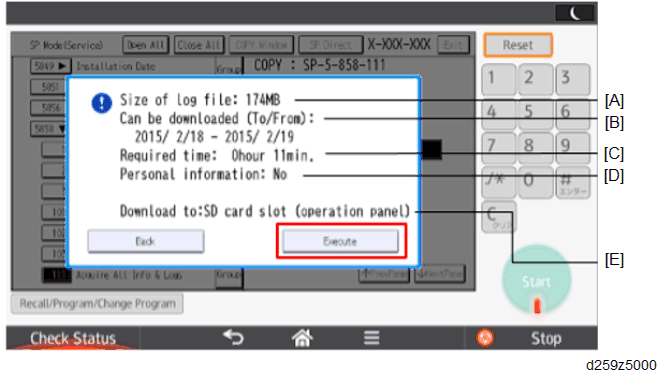
[A]
File size
[B]
Period to copy
[C]
Estimated time to copy
[D]
If [Fax Contacts] is displayed, it means that the fax destinations will be included in the fax information.
[E]
Where the data will be copied.
- The approximate time it takes to transfer the debug log is as follows. Transfer time may be affected by the type or format of the SD card.
- Controller log (GW debug log): 2 - 20 minutes
- Engine log: 2 minutes
- Operation panel log: 2 - 20 minutes
- If the estimated time is not calculated due to an error, an error code will be displayed.
- Error code -1: Other problem.
- Error code -2: No SD card is inserted in the service slot or in the SD slot on the side of the operation panel. Insert an SD card to either of the SD slots.
- Error code -3: The SD card is locked. Unlock the SD card as shown below
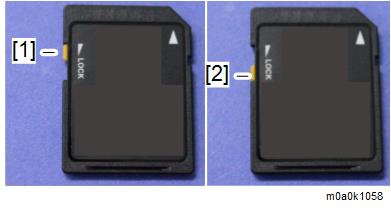
- Unlocked
- Locked
- Wait for the information and/or logs to be copied to the SD card.
After a message stating that the process has completed appears on the operation panel, make sure that the LED light next to the SD slot is not flashing. Then, remove the SD card.
- The process of obtaining logs fails when:
- the size of the logs to obtain exceeds the amount of space available on the SD card.
- the SD card is removed while the logs are being copied to it.
- the SD card is not formatted.
- If ‘failed’ appears on the touch panel display, turn OFF the main power, and then recover from step 1 again.
- Refer to "Log File List" below to check the location of log files and file name.