
- Prepare the necessary equipment and check the following points before you visit the customer site. For details, ask the @Remote key person.
- For information on how to enter the "Maintenance Mode (SP mode)", contact the supervisor in your branch office.
- Install the SOM (Smart Organizing Monitor) utility on a PC in advance.
- Make sure that the latest version of the firmware is installed on the machine.
Check Points before Making @Remote Settings
Connect a PC and the machine with a crossed wiring LAN cable or a USB cable.
- Check the IP address of the machine. (When using a USB cable, skip this step.)
- Check the IP address of the customer engineer's PC.
Set an IP address for the customer engineer's PC which is ±1 from the machine's IP address. (When using a USB cable, skip this step.)
Example:
Machine's IP address: 192.168.000.001
Set the IP address for the PC: 192.168.000.002- Start the SOM utility.
- Click [Connect Printer] in the SOM menu.
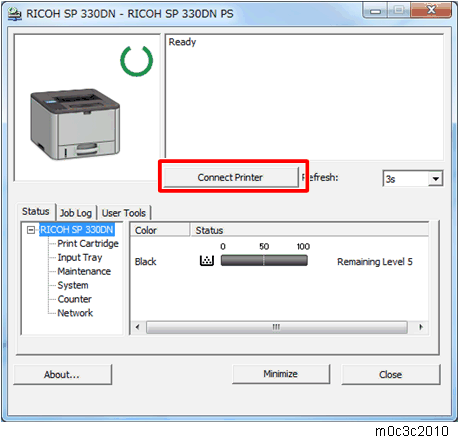
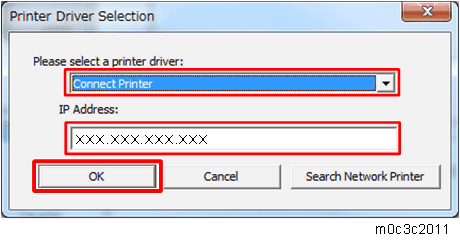
Select [Connect Printer] in the printer driver selection screen, input the IP address of the machine and click [OK].
When using a USB cable, select "USB port".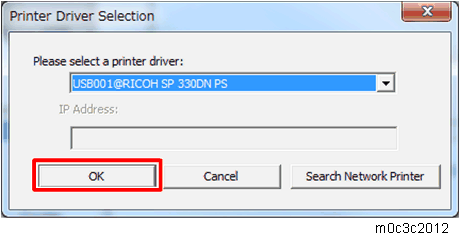
- Click [Printer Configuration] in the [User Tools] tab.

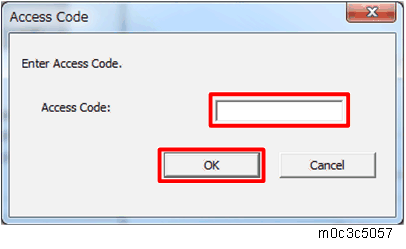
- Input the access code in the access code input screen and click [OK]. (Administrator's password: Admin)
- Select the [@Remote] tab in the printer setting screen.
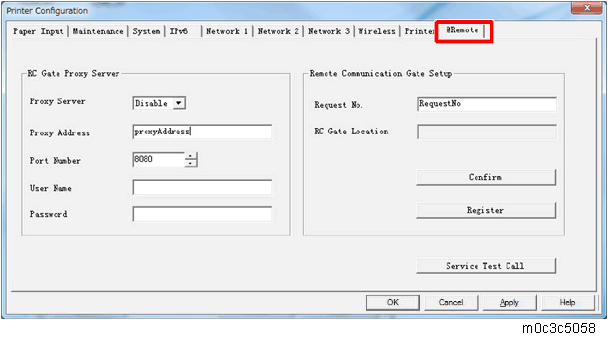
- Input the following items if necessary, then click [OK].
[RC Gate Proxy Server: Proxy Server]: Select [Enable] in the pull down menu.[RC Gate Proxy Server: Proxy Address]: Input the address of the proxy server.
[RC Gate Proxy Server: Port Number]: Input the HTTP proxy port number.
[RC Gate Proxy Server: User Name]: Enter the HTTP proxy authentication user name.
[RC Gate Proxy Server: Password]: Enter the HTTP proxy authentication password.
[Remote Communication Gate Setup: Request No.]: Input the request No.
- Enter the "Maintenance Mode (SP mode)".
- Check if the function flag is "Disable (Default)".
SP menu > [@Remote] > [Remote Service] > [Function Flag] - Remove the USB cable from the machine, and connect to the user's LAN.
Restore the IP address of the customer engineer's PC. (When using a USB cable, skip this step.)
Execute the @Remote Settings
Enter the "Maintenance Mode (SP mode)".
Check if the @Remote status is "0".
SP menu > [@Remote] > [Remote Service] > [Instl:Condition]
If the @Remote status is not "0", ask the @Remote Center Administrator.- Confirm the Request Number.
SP menu > [@Remote] > [Remote Service] > [Instl:Reference] Check the confirmation result.
SP menu > [@Remote] > [Remote Service] > [Instl:Ref Rslt]Value
Meaning
Solution/ Workaround
0
Succeeded
-
1 Request number error Check the request number again. 3
Communication error (proxy enabled)
Check the network condition.
4
Communication error (proxy disabled)
Check the network condition.
5
Proxy error (authentication error)
Check the proxy user name and password.
8
Other error
See "Error Codes" below this.
9
Request number confirmation executing
Processing… Please wait.
- Make sure that the screen displays the Location Information only when it has been input at the Center GUI.
SP menu > [@Remote] > [Remote Service] > [Instl:Ref Section] - Execute the registration.
SP menu > [@Remote] > [Remote Service] > [Instl:Rgstltn] Check the registration result.
SP menu > [@Remote] > [Remote Service] > [Instl:Rgstltn Rst]Value
Meaning
Solution/ Workaround
0
Succeeded
-
2
Already registered
Check the registration status.
3
Communication error (proxy enabled)
Check the network condition.
4
Communication error (proxy disabled)
Check the network condition.
5
Proxy error (Authentication error)
Check the proxy user name and password.
8
Other error
See "Error Codes" below this.
9
Request number registration executing
Processing… Please wait.
- Make sure that the function flag is "Enable".
SP menu > [@Remote] > [Remote Service] >[Function Flag]
After Setting
The first manual call after setting is considered as a test call. Be sure to execute the test call, or the first manual call from the customer will be considered as the test call.
- Enter the "Maintenance Mode (SP mode)".
Execute the "Manual Call".
SP menu > [@Remote] > [Remote Service] > [Remote Diagnostics]"Running…" is displayed for about 3 seconds. This message disappears automatically after 3 seconds, and then returns to [Remote Service] menu.
Error Codes
When other errors occur, check the following error code list
SP menu > [@Remote] > [Remote Service] > [Instl: ErrorCode]
Caused by Operation Error, Incorrect Setting
Code | Meaning | Solution/ Workaround |
|---|---|---|
-12003 | Attempted registration without execution of a confirmation and no previous registration. | Perform Confirmation before attempting the Registration. |
-12004 | Attempted setting with illegal entries for certification and ID2. | Check the ID2 of the machine. |
-12006 | A confirmation request was made after the confirmation had been already completed. | Execute registration. |
-12008 | Update certification failed because mainframe was in use. | Check the machine condition. If the machine is in use, try again later. |
Error Caused by Response from GW URL
Code | Meaning | Solution/ Workaround |
|---|---|---|
-2387 | Not supported at the Service Center | |
-2389 | Database out of service | |
-2390 | Program out of service | |
-2391 | Two registrations for the same mainframe | Check the registration condition of the machine |
-2392 | Parameter error | |
-2393 | External RCG not managed | |
-2394 | Mainframe not managed | |
-2395 | Box ID for external RCG is illegal. | |
-2396 | Mainframe ID for external RCG is illegal. | |
-2397 | Incorrect ID2 format | Check the ID2 of the machine. |
-2398 | Incorrect request number format | Check the Request No. |