- First download the new firmware to the SD card.
- Turn OFF the main power.
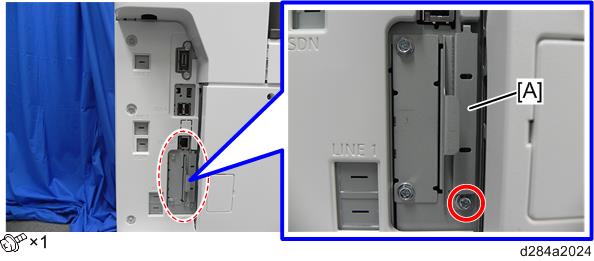
- Remove the SD card slot cover [A].
Insert the SD card [A] straight in slot 2.
- Check whether the card is properly in the SD card slot. When a SD card is inserted, a click is heard, and it is locked.
- To remove the card, release by pressing once in the set state.
- Turn ON the main power.
- Wait until the update screen starts (about 45 seconds).
When it appears, "Please Wait" is displayed. - Check whether a program installation screen is displayed. (English display) When the SD card contains two or more software modules, they are displayed as follows.
When two or more software names are displayed
- Press the module selection button or [1] - [5] on the 10-key pad.
- Choose the appropriate module. (If already selected, cancel the selection)
Operation of keys or buttons
Keys or buttons to press
Contents
[Exit] or 10 key [0]
Returns to normal screen.
[Start] Key
Select all modules.
[Clear/Stop] key
Cancel all selections.
Display contents
On the above screen, two programs, i.e., engine firmware and printer application are displayed. (The screen may change depending on the firmware or application).
The display contents are as follows:
Display
Contents
ROM:
Display installed module number / version information.
NEW:
Display module number / version information in the card.
The upper row corresponds to the module number, the lower row corresponds to the version name.
Select the module with the module selection button or 10 key operation. The selected module is highlighted, and [Verify] and [Update] are displayed.
- Depending on the combination of modules to update, it may not be possible to select all of them simultaneously.
Key or button operations
Keys or buttons to press
Contents
[Update] or [#] key
Update the ROM of the selected module.
[Verify] button or [./*] key
Perform verification of the selected module.
- Press the [Update] or [#] key, and perform software update.
- During firmware update, a “firmware update/ verification progress screen" is displayed. When firmware update is complete, a “firmware update end screen" is displayed.
- In the middle row, the name of the module currently being updated is displayed. (in this case, the printer module is being updated)
- In the lower row, a progress bar is displayed in ten steps. (The more *, the more the progress.)
Firmware update end screen
- This screen is displayed when all selected firmware modules are to be updated. "printer" in the second row shows that the module updated last is the printer. (When more than one are updated simultaneously, only what was updated last is displayed.)
- When Verify has completed normally, the Update done display of the above screen is "Verify done." If "Verify Error" is displayed, reinstall the software of the application displayed in the lower row.
- After switching power OFF, remove the SD card.
- Turn the main power ON again, and check whether the machine is operating normally.
- Return the SD card slot cover to the original position.
- When the power supply is switched OFF during firmware update, update is interrupted, and the power is switched ON again, normal operation cannot be guaranteed.
- To guarantee operation, an update error continues to be displayed until update is successful.
- In this case, insert the SD card again, switch the power ON, and continue download of firmware from the SD card automatically.
- The PS3 firmware program is included in the preinstalled PDF firmware. In the default state, although the PS3 firmware program is hidden in the disabled state, the function is enabled by installing the PS3 card. (The program installed in the PS3 card is a dongle (key) for enabling the PS3 function).
- Due to the above specification, the self-diagnosis result report shows the ROM module number / software version of the PDF firmware at the PS location.