- Turn OFF the main power and unplug the power cord from the wall socket. If installing without turning OFF the main power, an electric shock or a malfunction may occur.
- Do not turn the power on until you perform "adjustment after installation," or it may not start normally.
- Remove all tapes and shipping retainers.
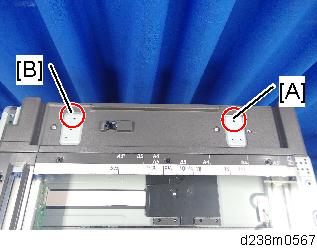
- Insert the two stud screws ([A] is the larger stud, [B] is the smaller stud).
- Mount the ARDF [A] by aligning the screw keyholes [B] of the ARDF support plate over the stud screws.
- Slide the ARDF toward the front of the machine.
- Secure the ARDF with the two knob screws [C].
- Align the rear left corner of the platen sheet [A] with the corner [B] on the exposure glass.
- Close the ARDF.
- Open the ARDF and check that the platen sheet is correctly attached.
- Remove the rear cover [A].
Connect the ARDF cable as shown and mount the bracket [A] on the machine’s rear frame.
Make sure to connect the grounding wire.- Connect the scanner cable to the connector at the machine’s rear.
- Reattach the rear cover.
- Lift the ARDF original tray.
Slide the stamp holder [A] out and install the stamp cartridge in it, if necessary.
Close the holder.
After the stamp installation, be sure to slide the holder in correctly. Make sure to slide it in thoroughly until the reference marks on the holder and exterior cover are aligned. If it is not mounted correctly, the machine detects a J001 paper jam.- Attach the decals [A] and [B] to the top cover as shown. Choose the language that you want.
- Attach the decal [A] to the scanner front cover.
- Plug in and turn ON the main power.
- Set SP4-688-001 (DF Density Adjustment ARDF) to "106".
- Check the ARDF operation, and make a full size copy. Check that the registrations (side-to-side and leading edge) and image skew are correct. If they are not, adjust the registrations and image skew. (ADF Image Adjustment)