- Make sure that you have the SMC report (Factory SP Settings). This report comes with the machine.
- Output the SMC data ("ALL") using SP5-990-001/SP5-992-001.
- Turn OFF the main power and unplug the power cord.
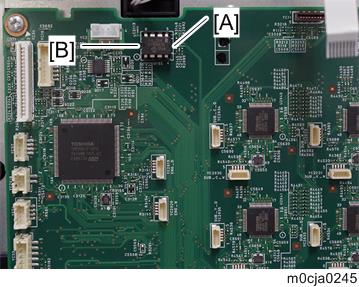
Replace the NVRAM on the Main/Engine PCB (PCB1) with a new one.
- Install a NVRAM [A] so that the indentation [B] on the NVRAM corresponds with the mark on the Main/Engine PCB (PCB1). Incorrect installation of the NVRAM will damage both the Main/Engine PCB (PCB1) and NVRAM.

- Install a NVRAM [A] so that the indentation [B] on the NVRAM corresponds with the mark on the Main/Engine PCB (PCB1). Incorrect installation of the NVRAM will damage both the Main/Engine PCB (PCB1) and NVRAM.
Plug in the power cord.
Open the rear cover, and then turn ON the main power.
Opening the rear cover prevents the machine from entering the initialization process.Execute SP5-901-00x "All Data Initialize".
Destination SP AA SP5-901-008 NA / LA (120 V) SP5-901-007 EU / LA (230 V) SP5-901-006 Do not use SP5-901-009 (Oceania).
Turn OFF the main power.
Close the rear cover, and then turn ON the main power again.
The machine initialization starts. This takes several minutes.Set SP4-698-003 “Factory mode” to “1”.
Do not open the front cover, and do not turn OFF/ON the main power until step 10.
- For information on how to configure the above SP, contact the supervisor in your branch office.
- Displayed number will be changed to “0” soon after setting SP4-698-003 to “1”. This is normal operation and the SP has been executed correctly.
AP only: Set SP5-805-002 to 1.
NA/EU: Leave it in the default setting (0).- Turn OFF the main power, then turn ON the main power again.
Check the SMC report (Factory SP Settings) from step 1 or 2, and set the user tool and SP settings so they are the same as before.