<Automatic Activation Procedure>
- In the Manage Fiery Options window, click Activate.
<Manage Fiery Options window for Server Options>
<License Activation window for Client Options> - To agree to the terms and conditions of the license agreement, click Continue.
For License Activation Code, type the LAC and....
Server Options: click Activate.
Client Options: click Continue.- If the E-25C needs a proxy server to connect to Internet, the following screen may appear. In such case, click the link of "use a proxy server" and fill in the necessary information for proxy server, then click Apply. Then click Continue.
- If the Fiery option name is correct, click Activate.
- The Fiery option is activated.
<Server Option>
<Client Option> - If the activation requires a restart of the E-25C, click Restart to restart now, or click Finish to activate more options before restarting.
If the activation does not require a restart of the E-25C, just click Finish.
If activation requires a restart:
<Server Option>
If activation does not require a restart:
<Server Option>
<Client Option> - For Server Option only: Print the configuration sheet and keep it (for the case that the key chip becomes defective). [Link to Printing the Configuration Page or Test Sheets]
<Manual Activation Procedure>
- In the Manage Fiery Options window, click Activate.
<Manage Fiery Options window for Server Options>
<License Activation window for Client Options> - To agree to the terms and conditions of the license agreement, click Continue.
- For License Activation Code, type the LAC and....
Server Options: click Activate.
Client Options: click Continue. - Click Continue to proceed with the manual process.
- Click Create Request File and save the file.
- Copy the request file to a PC that is connected to the Internet.
It is also possible that you use the same PC by changing the location/connection. - On the PC that is connected to the Internet, open a browser and go to licensing.efi.com.
- Click Choose File, select the request file, and then click Upload Request File.
- If the Fiery option name is correct, click Continue.
A license file is generated. - Click Download License File and save the file.
- Copy the license file to the PC where you first entered the License Activation Code.
- Return to the Generate License window and click Yes.
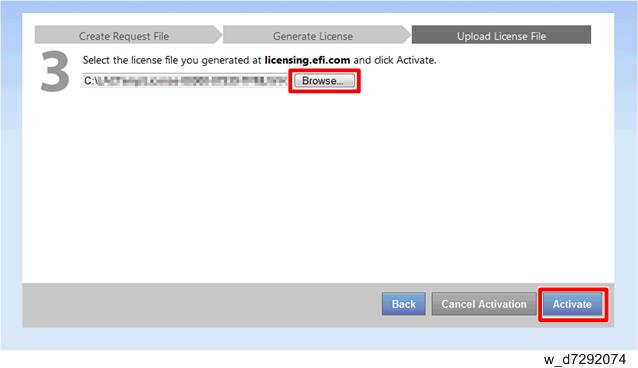
If you had closed that window, restart from step 1 (open the Manage Fiery Options window) and click Activate, to reach to the following window. - Click Browse, select and open the license file, and then click Activate.
- The Fiery option is activated.
<Server Option>
<Client Option> - If the activation requires a restart of the Fiery print controller, click Restart to restart now, or click Finish to activate more options before restarting.
If the activation does not require a restart of the Fiery print controller, just click Finish.
If activation requires a restart:
<Server Option>
If activation does not require a restart:
<Server Option>
<Client Option> - For Server Option only: Print the configuration sheet and keep it (for the case that the key chip becomes defective). [Link to Printing the Configuration Page or Test Sheets]